Thursday, August 27, 2009

Bailey's Room...

This is kinda old, but I don't think I've posted it here on the blog. I've been MIA for so long and have little time to do much as I adjust to the kids being back in school, so it's at least something.

My daughter Bailey's room was fun to decorate. When we started the makeover it was to move out her sister so that she could have her own room. My budget was very tight yet I was able to accomplish this for about $300.


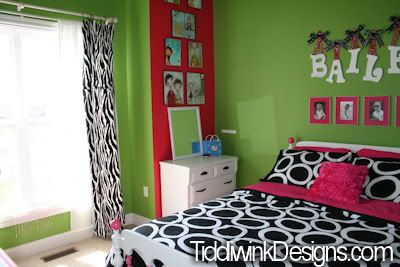
Bailey LOVES the color pink. But I can only handle so much of it. Therefore, I had to keep her away from the room as I started with the paint. The ceilings in here are 12 feet tall, so painting in its self was challenging. I went with a bright green through out the majority of the room and accented the entry way wall and the back wall with the bright pink. It almost looks red depending on the time of day.

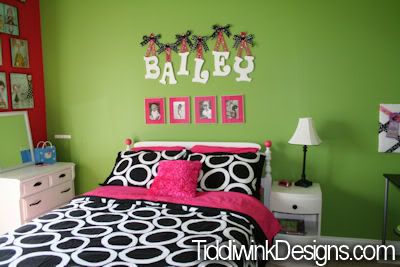
The furniture is mostly all from my husband's grandmothers estate. She had passed away recently so I took a mis-matched bedroom group and painted it all white. The bed is an older style bed with spindles, so I painted the balls and spindles the same pink as the walls. The hardware was replaced with updated matte black pulls.


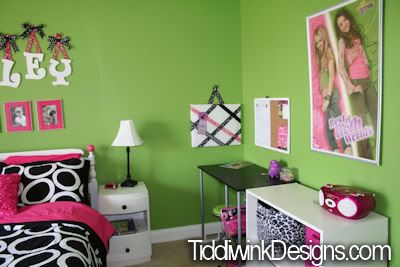
Because the colors are already all so bright I went with simple and plain white letters for her name and used mismatched black and white pattern ribbons. I don't like everything to match. So you will notice that the black and white patterns are all different. The bulletin board was made with a left over canvas and the remaining ribbons.


Bailey, REALLY wanted this circle pattern comforter set from Target. But it was a bit more pricey than I wanted to spend, but in the end I couldn't agree more with her choice. As you see the curtain is another black and white. The corner shelf unit was also from the estate and was in pretty bad shape and dated until I added the white and bright pink paint. The dresser was my sister's when she was a child and has been repainted a couple of times since my kid's have been around. I went with the ovals behind the hardware because regardless of how much I sanded down the wood I couldn't get the old hardware's indentions out.

So that's her room. I re-did all of the kid's rooms since then and hope to share those as well. Hopefully, you will have gotten some sort of ideas from this.

Tuesday, August 4, 2009

New Artwork

New artwork . They are listed on etsy and ebay but will be coming soon to TiddliwinkDesigns.com

This set, Hannah's Fairies, was created to cooridinate with the Pottery Barn Kids bedding set. I think these girls are adorable.

The nursery rythym set was created for my cousin and his wife who are expecting their first son next month. Humpty Dumpty and Hey Diddle Diddle are two of my favorite nursery rythyms!


This set was just for fun. I sketched it out a couple of months ago and forgot about it. It's bright and colorful and reminds me a lot of my earlier works, but I still like it a lot.

Thursday, July 30, 2009

A paint spot makeover

My little painting spot has moved several times over the years. It started at the kitchen table, moved to our very expensive dinning table, then was moved to the downstairs in various places. Eventually I landed in the dungeon. The unfinished area of our house, which is also the home of our water heater, furnace and electricity central. I did this in an effort to keep my clutter out of sight from my husband, who HATES clutter. But all artists know that painting in dark spaces is very inhibiting. Even after investing in 2 true light lamps I still had a difficult time. Within the last 6 months I moved my stuff behind our sofa in the family room, which is directly in between 2 french double doors with LOTS of natural lighting. I quickly discovered how much I LOVED painting here. I could see the kids, I could see the television, I could see my ART!

Except it was getting pretty cluttered and messy. Mostly because I was doing this all on an old poker table covered in cardboard. This week I worked on cleaning up the clutter and created a nook I can now retreat to and feel relaxed!

Here is the outcome:


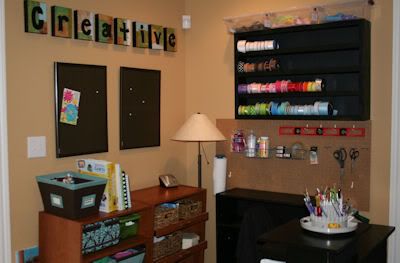
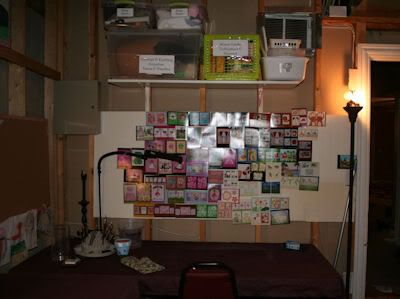
My dad helped me to make this really awesome ribbon holder. I HATE dowels going through my ribbon because if I want to organize by color and I add new ribbon then I have to take ALL of the other ribbon spools off and start from scratch. This holder has a lip on the edge of each shelf to prevent my ribbon from rolling off. I spray painted it black, and then stapled black poster board to the back. Lovin' it, right?? Dad's are awesome.

I moved my peg board from the dungeon to below the ribbon holder. So much more efficient.

This set of canvases I made out of scrap paper I had on hand, mod podge and paint. I love it!

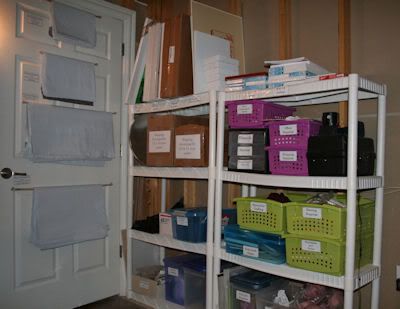
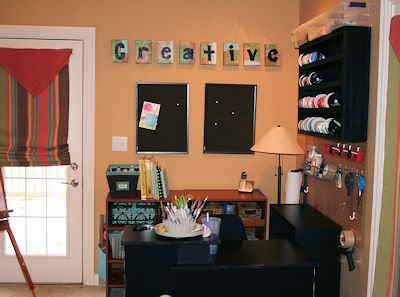
I bought the black desk and book shelf and lined the back side of the desk with fabric and paint so that the unfinished edges wouldn't show. The storage furniture in the back I got on clearance, and is actually closet organization furniture. The shelves actually slide out. I like that a lot.

Of course, most of my stuff is still in the dungeon but that's okay. It's stored away neatly in the area that has no light. But I will now have all of the light I need, and it looks good enough not to have to hide.


I do try my best to label everything. Although I mostly paint I have everything from foam crafts to embossing guns stored here.


This is where I keep most of my shipping supplies and canvases.

I used to put up images of my artwork on this back wall for inspiration, but I've been so busy that I stopped doing that a couple of years ago.

Tuesday, July 28, 2009

Old and new art...

I found this picture of the kid's toy room when I first painted a mural in there. My sister did the cute little girls on the swings and the baby crawling in the grass. That was painted over for an underwater theme and then painted over again, but without a mural.


I've made a couple or three new designs. They will be listed at TiddliwinkDesigns.com soon. In the mean time they are on etsy and ebay. I've been swamped to say the least. In addition I'm working on my working area. I can't wait to post pictures of that stuff. Exciting.


Here are the new designs:


Friday, July 24, 2009

And when you plan a wedding...

don't forget to make your entrance unforgetable!


I really loved this on many levels. But could you imagine being asked to be a bridesmaid and then told, "oh, yea, I am going to need you to dance your way down the aisle"?

But I still shed a tiny tear when the bride emerged. Not only did she get the crowd to stand but they applauded as well! What fun years this couple will likely have ahead of them.

Louisville Theatre Review...

"The most glorious visual element of all occurs at the end, however. Without giving it away, I'll say that artist Keshia Tatum Smith has created something breathtaking that underscores The Secret Garden's message that with love and attention, regeneration is possible even after the darkest of times."

I am so proud!

You can see the rest of the review here.

Monday, July 20, 2009

And it's complete...

I have finished the mural for "The Secret Garden." Darby and I went to see the show this past weekend and it was fabulous. The entire show as a whole. I was very pleased with the production skills of the Shelby County Community Theater. The cast was amazing and extrememly talented. If you are a local, you should definitly take the time to see.

Here are the pictures.


Now I can get back to my regular schedule. I have several custom orders to get working on and a LOAD of ideas floating in my brain. Just need the time to get working.